SQUISHBOI

Designing
A Multidimensional Sound Controller
UX Timeline: 2 Months
Teammate: Andrew Piepenbrink


SQUISHBOI is the result of nearly a year of ideating, researching, prototyping, and eventually user testing at the 2019 CalArts Expo. This instrument is my brainchild and the most ambitious design project I've taken on. The goal was to create something totally new—an instrument unlike any other that could be bought off of the shelf at Guitar Center. Once a functional prototype was achieved, focus shifted to the presentation and aesthetics of the instrument, thus beginning a 2 month sprint that took us deep into the minds of the controller's intended users.
- Design Artifacts
Facilitator
Researcher
Interface Designer
Interaction Designer
User Testing
Designed and prototyped a functional user interface. for the SQUISHBOI
Organized our team and lead ideation exercises. Ensured that deadlines were met.
Conducted hands on user testing at the 2019
CalArts Expo
Analyzed user interaction in regards to the SQUISHBOI's Interface.
Researched everything from sensor technologies to Latex specifications.
Role
User Journey Diagram

Prototyping

Wekinator
ML Software
Ableton
Iron Pipe
Flourescent
Paint
UV Light
Wood + Hardware
Snare Drum
+ latex
Tools
Laptop
For Prototype

Adafruit
Circuit Parts
Eagle
PCB Software
Arduino
The prototyping of the SQUISHBOI controller took place in many stages and is still a work in progress, as I continue to explore design modifications and alternatives to its sensors and materials as I move the project toward its final design. I was fortunate to have done a considerable amount of design work on the SQUISHBOI's sensor circuit network prior to engaging in any form of formal user testing or design thinking processes. This allowed me to apply user-centric thinking to what was already a functional prototype rather than having to use any sort of Wizard of Oz fakery in the testing phase.
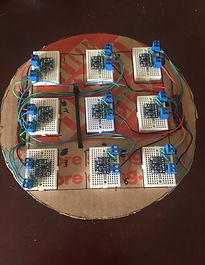
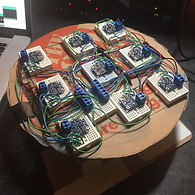
The first functional prototype was born on a breadboard using an Arduino Mega, and several breakout boards from Adafruit. I soon moved this prototype over to a cardboard structure containing a series of smaller breadboards which allowed me to test different sensor layouts and check for interferences in the Time of Flight (TOF) array. I also swapped the Arduino for a Teensy microcontroller which gave me MIDI functionality over the USB port and allowed for preliminary testing of sonic interactions prior to any costly fabrication.


The enclosure for the final prototype was adapted from a drum shell. The drum's existing hardware allowed our team to easily attach and modify the rubberized latex membrane that would form the instruments playing surface. We were a bit worried that this would bias users interaction with the instrument, and noted this as a possible area of concern to pay close attention to during testing. The structure used to hold the SQUISHBOI's was assembled with wood and iron pipe making it easy to take apart and transport.
Once the circuit was optimized, I began designing a PCB in Autodesk's Eagle software. Placing the circuit on a single board allowed for consistency in sensor placement across multiple prototypes, shortened the assembly time, and greatly improved durability. There was a tradeoff in terms of cost per square inch, but in this case we believed that the benefits of this design made it worthwhile.
Testing
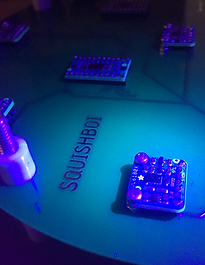
SQUISHBOI was premiered at the 2019 CalArts Expo, a showcase of cutting edge student work from all departments that is put on annually and curated by student and distinguished alumni. SQUISHBOI was selected to make its debut in CalArts' MOD [modular] theatre alongside other projects from some of the top students in the Institute. SQUISHBOI was installed the week leading up to the event so that it could be presented, along with the rest of the MOD theatre team's projects, to CalArts' board of trustees. Although this presentation was more of an informal walkthrough, I still gathered some valuable insight from their interactions with the controller. Some participants (whom I inferred to be affiliated with Disney) remarked about how great something like this could be at their theme parks–an application for these technologies that hadn't yet crossed my mind. This was also a valuable experience because it gave me a dry run for the actual event, and helped me to realize that I needed more UV light to make the installation pop the way I was hoping for. Fortunately all it took to fix that issue was a quick run the hardware store and a bit more paint.

What We Learned
On the day of the event, everything was set and ready to go. I quickly reviewed the user journey diagram and took note of some of the key areas of concern within the interaction so that I could be sure to pay close attention to those aspects amidst the chaotic environment. The scene was set, and it was time to see if all of our work had paid off, or if it was time to get back to the drawing board.
Create better
mappings
Visual aesthetic
was successful
Key Findings
Test Alternative
Enclosures